

Shared Storage systems are very common in enterprise computing but it’s not cheap or easy to get access to the technology for eduction or testing purposes. In this posting I investigate if a system like Openfiler can work in those circumstances, and if it’s worth the effort.
When a computer system has hundreds, thousands, or even millions of users, the resources needed to run that system are quite different then those needed to run a single-user application like a spreadsheet or word processor. The enterprise level infrastructure that runs large multi-user applications has moved in a cycle from the days of big mainframe hardware, through to large numbers of commodity servers, and is now moving back to virtual systems running on high-powered servers. When a data centre is operating large numbers of servers, be they virtual or physical machines, there is a need for a shared storage system to be in place so that the storage requirements of those servers can be consolidated, managed effectively, and, through the sharing aspect, duplication can be reduced. The most common forms of shared storage are the SAN or NAS.
Storage Area Networks (SAN’s) and Network Attached Storage (NAS) offer two different types of solution to the problem of shared storage. SAN’s tend to be the higher end solution, offering performance and flexibility whereas NAS is the more economical alternative that is a little less flexible but easier to set-up and use. Perhaps the single biggest, most obvious difference between SAN and NAS is in how the storage space is made available to users. NAS systems tend to offer chunks of storage space in a ready to go format with the NAS device acting like a file server on the network. SAN systems on the other hand present their storage to other servers which treat the space as if it were contained on a hard drive built into the server. With a SAN, several servers can treat the same SAN presented storage as if it were one of their own hard drives.
As both technologies mature they are increasing converging and the lines between the two concepts is blurring as more and more systems provide both style of services. One example of this convergence is Openfiler.
Openfiler is a Linux based operating system that effectively turns any server into a dedicated storage system. Openfiler supports a wide range of technologies and protocols associated with shared storage, from the basics like FTP and RSYNC, up to NAS style configurations and even the iSCSI protocol commonly used to access SAN storage across IP networks. Knowing that iSCSI is used for SAN systems presents an interesting educational possibility.
As Openfiler is at it’s heart just another Linux distro (albeit one with a very specialised purpose) it is possible to install it as a guest in a virtualisation system. Once installed and properly configured, it can then be used as if it were a SAN, which means that it’s possible to use it for any scenario that requires that kind of storage, like for example Oracle RAC or SQL Server Clusters.
In this posting I’ll go through the steps needed to get Openfiler up and running in a desktop virtualisation environment, work through the process of configuring Openfiler to be used as a provider of iSCSI services, as well as set-up a Linux server and Windows server to use the shared storage provided by Openfiler.
Installing Openfiler
I currently use the VirtualBox desktop virtualisation system for building test environments. VirtualBox is provided free of charge by Oracle and offers a lot of features that I find useful. (More details can be found on the VirtualBox website).

Here is the main screen of VirtualBox. On the left hand side is a list of the virtual machines (VM’s) currently available for use. The following steps will outline how to create the highlighted VM labelled “Openfiler”.
Click New to open the Create Virtual Machine wizard.
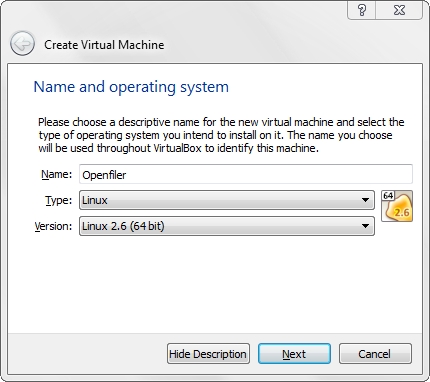
Enter the name of the VM – note that this name is not the same as the host name of the machine, that will be set during the installation of the Operating System and can be reconfigured within the Operating System independently of the name set here, which is only a descriptive name of the VM. Select the type of operating system from the drop down list. Select the version of the operating system from the second drop down list.
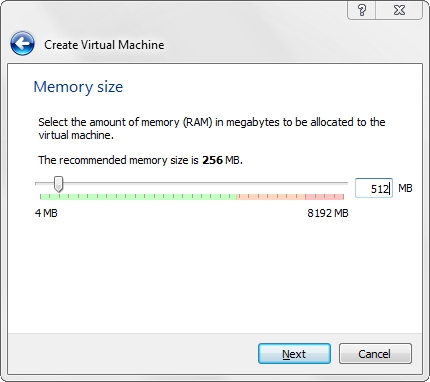
Select the amount of memory to be allocated to the virtual machine. Openfiler is not memory intensive and can easily operate with 512MB of RAM.
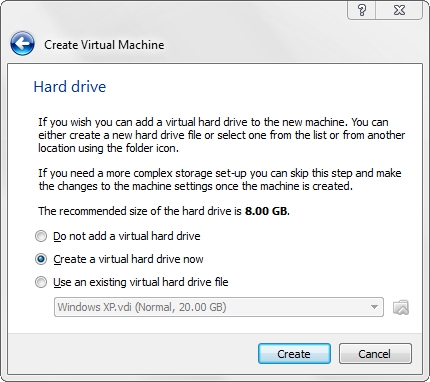
Select the option to create a virtual hard drive. This will create a file that will act as the hard drive for the virtual machine.

VirtualBox allows you to select from a variety of virtual hard drive types which allows you to use the virtual drive with other virtualisation software. If you do not use any other virtualisation software then the default option is fine.
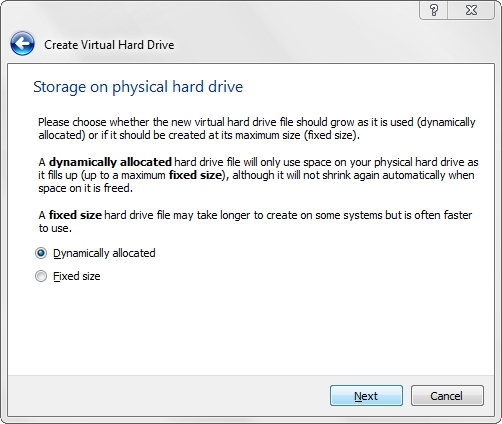
VirtualBox can create virtual hard drives of a set size (e.g. 100GB) that are made up of a file that is the size of the virtual drive regardless of the size of the contents of the virtual drive. Alternatively, the file used to support the virtual drive can be set to start out quite small and expand in size as needed up to the size set for the virtual drive.
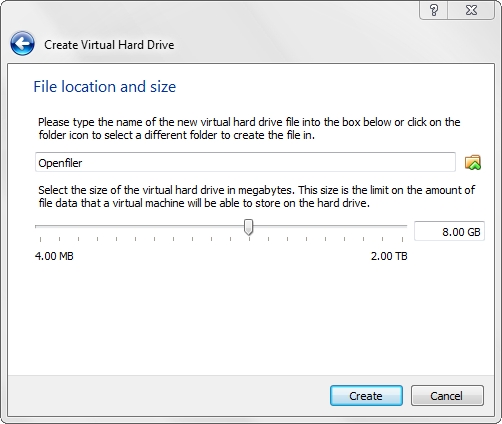
Set the name and location for the file that will support the virtual drive. Set the size of the virtual drive – this is what the operating system will see as the size of the hard drive. VirtualBox will recommend a hard drive size depending on the operating system you are installing, in this case 8GB. Normally, the drive will be too small for a realistic installation and considering Openfiler is to be used for shared storage 8GB doesn’t seem anywhere near enough, but I like to install the Openfiler operating system on a drive separate to where the shared storage will be located, so for the OS alone 8GB is adequate.
Once the VM is created its settings can be reviewed and modified from the VirtualBox main screen. The main screen is also where the VM can be started from.
![2013-02-25 08_01_47-Openfiler [Running] - Oracle VM VirtualBox](https://martinminnock.com/wp-content/uploads/2013/02/2013-02-25-08_01_47-openfiler-running-oracle-vm-virtualbox.jpg)
When the new VM is started for the first time, VirtualBox prompts you to select the location of the installation media. Select the location where the ISO file was downloaded to or select the CD/DVD if you have the installation on disc.
As Openfiler is based on rPath Linux the installation routine will be familiar to anyone who has performed an install of a recent Linux distribution.
![2013-02-25 08_03_23-Openfiler [Running] - Oracle VM VirtualBox](https://martinminnock.com/wp-content/uploads/2013/02/2013-02-25-08_03_23-openfiler-running-oracle-vm-virtualbox.jpg)
Selecting the graphical mode for installation starts the install process.
![2013-02-25 08_06_27-Openfiler [Running] - Oracle VM VirtualBox](https://martinminnock.com/wp-content/uploads/2013/02/2013-02-25-08_06_27-openfiler-running-oracle-vm-virtualbox.jpg)
Select the keyboard layout appropriate for your keyboard hardware (here in Ireland we use the same keyboard layout as the UK).
![2013-02-25 08_07_01-Openfiler [Running] - Oracle VM VirtualBox](https://martinminnock.com/wp-content/uploads/2013/02/2013-02-25-08_07_01-openfiler-running-oracle-vm-virtualbox.jpg)
When the installation process attempts to move on past the keyboard selection it will notice that the hard drive configured for the VM is empty and unformatted and so will need to make changes to the drive that would result in loss of any data that might be on the drive. This is just a warning and is expected at this point – remember that all this is happening in a VM so will not impact on the underlying host system.
![2013-02-25 08_07_33-Openfiler [Running] - Oracle VM VirtualBox](https://martinminnock.com/wp-content/uploads/2013/02/2013-02-25-08_07_33-openfiler-running-oracle-vm-virtualbox.jpg)
Openfiler presents the usual options for configuring the hard drive and the temptation will be to select the default partitioning layout, thus letting Openfiler do all the work. However, this would be a mistake…
![2013-02-25 08_08_00-Openfiler [Running] - Oracle VM VirtualBox](https://martinminnock.com/wp-content/uploads/2013/02/2013-02-25-08_08_00-openfiler-running-oracle-vm-virtualbox.jpg)
…because, while everything seems to proceed as expected…
![2013-02-25 08_19_14-Openfiler [Running] - Oracle VM VirtualBox](https://martinminnock.com/wp-content/uploads/2013/02/2013-02-25-08_19_14-openfiler-running-oracle-vm-virtualbox.jpg)
…Openfiler doesn’t seem to support automatic layout of the hard drive partitions when the total drive size is quite small, despite the option being present.
![2013-02-25 08_19_56-Openfiler [Running] - Oracle VM VirtualBox](https://martinminnock.com/wp-content/uploads/2013/02/2013-02-25-08_19_56-openfiler-running-oracle-vm-virtualbox.jpg)
The red herring error messages would lead you to conclude that more hard drive space is needed, while in fact all that’s needed is some manual intervention in the layout of the drive.
![2013-02-25 08_20_20-Openfiler [Running] - Oracle VM VirtualBox](https://martinminnock.com/wp-content/uploads/2013/02/2013-02-25-08_20_20-openfiler-running-oracle-vm-virtualbox.jpg)
Select Create custom layout to manually configure the partitions on the drive.
![2013-02-25 08_21_42-Openfiler [Running] - Oracle VM VirtualBox](https://martinminnock.com/wp-content/uploads/2013/02/2013-02-25-08_21_42-openfiler-running-oracle-vm-virtualbox.jpg)
The custom layout option prompts you to define the different hard drive properties for the system. Start by configuring the /boot partition.
![2013-02-25 08_26_40-Openfiler [Running] - Oracle VM VirtualBox](https://martinminnock.com/wp-content/uploads/2013/02/2013-02-25-08_26_40-openfiler-running-oracle-vm-virtualbox.jpg)
Next, define the / partition.
![2013-02-25 08_27_58-Openfiler [Running] - Oracle VM VirtualBox](https://martinminnock.com/wp-content/uploads/2013/02/2013-02-25-08_27_58-openfiler-running-oracle-vm-virtualbox.jpg)
Finally, configure the swap partition – these three partitions are the minimum needed to get the operating system up and running.
![2013-02-25 08_28_20-Openfiler [Running] - Oracle VM VirtualBox](https://martinminnock.com/wp-content/uploads/2013/02/2013-02-25-08_28_20-openfiler-running-oracle-vm-virtualbox.jpg)
The summary screen displays the chosen configuration and allows you to make any changes that may be required.
![2013-02-25 08_28_44-Openfiler [Running] - Oracle VM VirtualBox](https://martinminnock.com/wp-content/uploads/2013/02/2013-02-25-08_28_44-openfiler-running-oracle-vm-virtualbox.jpg)
I set the RAM size to 512MB for the Openfiler VM and so it was necessary to enable the swap partition at this point in the procedure. The swap partition in Linux is a section of the hard drive that is used like RAM and is roughly equivalent to Virtual Memory in Windows.
![2013-02-25 08_29_07-Openfiler [Running] - Oracle VM VirtualBox](https://martinminnock.com/wp-content/uploads/2013/02/2013-02-25-08_29_07-openfiler-running-oracle-vm-virtualbox.jpg)
The Openfiler install allows you to configure options for the boot loader. This is useful if you’re creating a multi-boot system or if you have any other special requirements , like for example needing to set a password that must be entered in order for the system to boot. For testing purposes the default option is fine.
![2013-02-25 08_31_54-Openfiler [Running] - Oracle VM VirtualBox](https://martinminnock.com/wp-content/uploads/2013/02/2013-02-25-08_31_54-openfiler-running-oracle-vm-virtualbox.jpg)
It is advisable to set a static IP address for the Openfiler system.
![2013-02-25 08_32_36-Openfiler [Running] - Oracle VM VirtualBox](https://martinminnock.com/wp-content/uploads/2013/02/2013-02-25-08_32_36-openfiler-running-oracle-vm-virtualbox.jpg)
On the same screen you can configure the host name of the Openfiler server and any other networking parameters that might be appropriate.
![2013-02-25 08_33_05-Openfiler [Running] - Oracle VM VirtualBox](https://martinminnock.com/wp-content/uploads/2013/02/2013-02-25-08_33_05-openfiler-running-oracle-vm-virtualbox.jpg)
The time zone setting for the system can be set by clicking on the desired location on the graphical map or by selecting from the drop-down list.
UTC is the rather backward abbreviation for Coordinated Universal Time and is a standard by which clocks (and therefore time) are regulated. More details on UTC can be found on Wikipedia.
![2013-02-25 08_33_57-Openfiler [Running] - Oracle VM VirtualBox](https://martinminnock.com/wp-content/uploads/2013/02/2013-02-25-08_33_57-openfiler-running-oracle-vm-virtualbox.jpg)
Like any Linux system it is necessary to create a root user and password. The root user for Openfiler comes in useful if you need to access the server remotely via Putty or some mechanism other than the web interface or for working on the underlying operating system itself.
![2013-02-25 08_34_14-Openfiler [Running] - Oracle VM VirtualBox](https://martinminnock.com/wp-content/uploads/2013/02/2013-02-25-08_34_14-openfiler-running-oracle-vm-virtualbox.jpg)
With all the basic configuration steps complete it’s time to start the actual installation of the OS to disk.
![2013-02-25 08_34_34-Openfiler [Running] - Oracle VM VirtualBox](https://martinminnock.com/wp-content/uploads/2013/02/2013-02-25-08_34_34-openfiler-running-oracle-vm-virtualbox.jpg)
First, the disk is formatted (in this case the virtual disk presented by VirtualBox).
![2013-02-25 08_34_57-Openfiler [Running] - Oracle VM VirtualBox](https://martinminnock.com/wp-content/uploads/2013/02/2013-02-25-08_34_57-openfiler-running-oracle-vm-virtualbox.jpg)
With the “disk” ready to receive files, the operating system itself is copied into place on the drive.
![2013-02-25 08_39_13-Openfiler [Running] - Oracle VM VirtualBox](https://martinminnock.com/wp-content/uploads/2013/02/2013-02-25-08_39_13-openfiler-running-oracle-vm-virtualbox.jpg)
Once everything is installed the system needs to be restarted.
![2013-02-25 08_41_29-Openfiler [Running] - Oracle VM VirtualBox](https://martinminnock.com/wp-content/uploads/2013/02/2013-02-25-08_41_29-openfiler-running-oracle-vm-virtualbox.jpg)
The result of a boot of Openfiler can be surprising to anyone expecting to see a flashy, graphical Linux system. The command line interface pictured above is the main screen of a running Openfiler system but it is not the interface used to do meaningful work.
Instead, the Web Administration GIU (the location of which is revealed above the login prompt) is where all the real Openfiler action takes place.
